Bird's Nest Fern Care
Placement
PRO TIP: Keep your plant away from hot and cold air drafts. This includes window drafts, heaters, and air conditioning. Bird's Nest Ferns prefer a temperature between 70 and 85 degrees Fahrenheit. Night time temperatures should not vary more than a 10 degrees drop.
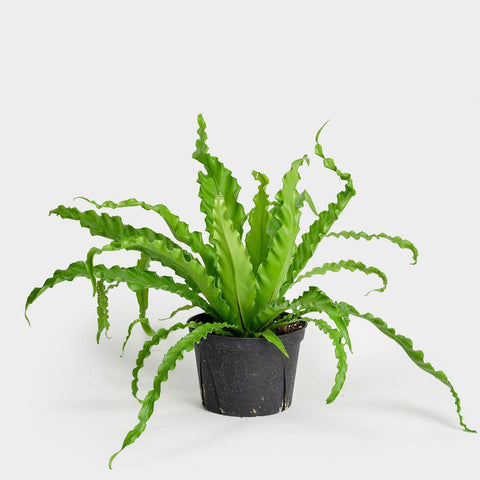
The Bird's Nest Fern Esplenium nidus is a tropical epiphytic plant that loves humidity and indirect light. Their bright green leaves fan out from a central nest like gathering. In their natural habitat they can grow to be upwards of 15ft in diameter, sprawling on the forest floor or taking host high up in the trees. There are a few varieties of Bird's Nest Ferns, but the care is similar among them all. Place your fern where it can receive medium to bright indirect light. This plant does not fare well with direct sunlight. Although the Bird's Nest Fern can tolerate lower light levels you will need to be more cautious not to overwater it.
If you’re unsure about your lighting conditions, please consult our guide for how to measure light in your space.

Bird's Nest Ferns display a wide morphology in leaf structure. The wavy leaves of a 'Nidus' Bird's Nest Fern are fun and playful.
Routine Maintenance
PRO TIP: Keep a tray of pebbles, filled with water underneath your plant. This provides extra humidity to the foliage, while keeping the water away from the soil.
Always be sure to assess your plant's watering needs upon receiving it. Before giving your plant a drink, it is best to check the moisture level in the soil first. Feel into the top few inches of the soil, if the top 1”-2“ of the soil are dry then your plant is ready to be watered. Below the top few inches should remain moist, but not soggy. Do not let the soil dry out thoroughly between waterings. Typically watering once a week will suffice. Your plant may need twice a week watering during the growing seasons when temperatures are warmer. Consider aerating the soil of your plant before the initial watering. We compact the soil to avoid shifting during transit, so aerating can help the soil breath and allow for moisture to be released.
Rotate your plant periodically to ensure even growth on all sides and dust the leaves often so the plant can photosynthesize efficiently. When dusting the leaves, also take the opportunity to inspect the undersides and keep an eye out for pests.
Remember each plant is a unique living thing and may have varying needs, especially in their individual locations. Pay attention to the condition of your Bird's Nest Fern and its watering needs and you will have a long and happy relationship.

Frequently Asked Questions
Help! My fern got too dry. What do I do?
- Start by giving your plant a nice, thorough watering! Then prune away any dry, crispy leaves with a clean pair of sheers. Keep a close eye on your plant and stay on top of watering to help it bounce back. Be sure not to overwater in compensation for the under-watering. Bird's Nest Ferns are more hardy than most fern varieties, and typically easier to bring back after an under watering.
Why is my Bird's Nest Fern losing color and turning pale?
- Not enough, or too much light can both cause color to fade on the leaves of the Bird's Nest Fern. Re-assess your lighting conditions and see if you can move it closer or further away from a natural light source. Monitor your plant to see if this improves the condition.
Why are my ferns leaves turning yellow?
- If the soil is being kept too moist, this can lead to root rot and yellowing leaves. Often when overwatering is the culprit, the leaves will have brown and yellow edging. Alternatively, if the soil becomes too dry entire leaves can turn completely yellow and fall. Check the moisture in the soil and see if watering should be adjusted.
There are brown raised markings on the underside of the leaves. What are they?
- Ferns are non flowering, asexual species that propagate through spores on the underside of leaves. This is one of the oldest forms of procreation!
How often should I fertilize my Bird's Nest Fern?
- In general, house plants will thrive when they are fertilized spring through fall. Fertilize once a month with an organic houseplant fertilizer, following the package instructions for dilution and administration. Greenery NYC uses an organic potting mix with a slow release fertilizer in the soil, so your plant will not need fertilizer within the first 6 months of receiving it.
How often does my Bird's Nest Fern need to be repotted?
- For smaller desktop plants, we suggest repotting once every 12-18 months. Typically you want to choose a potting vessel 1”- 2” larger in diameter to allow for growth. Don’t choose a pot much larger than the previous as this could drown the plants roots. If you prefer to maintain the current size of your plant, repot into the same vessel, providing new soil and trimming away some roots and foliage. Repotting in the spring or summer is ideal.
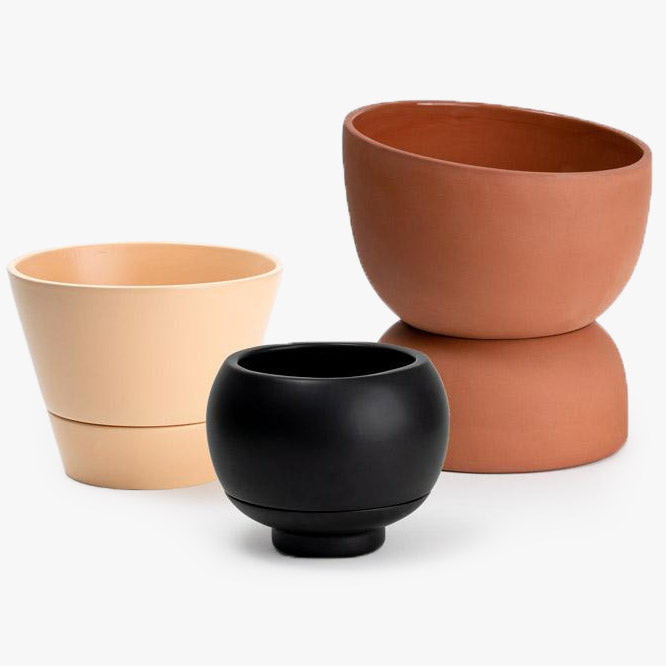
Standard Planter Instructions

All of our Standard Planters include a removable drainage plug to give our customers the option of drainage. While no drainage is sometimes preferred for its aesthetic simplicity, we don't recommend this option for beginners as watering mistakes can be hard to rectify.
Whether you choose to use drainage or not, we always recommend using a layer of drainage (such as our Aeration Stones) at the base of the planter. A drainage layer allows the plant's roots access to oxygen in the pockets between the drainage medium, and a lack of drainage can cause anaerobic damage to your plant.
If you decide to utilize the drainage hole for your pot, make sure to include a Plant Saucer beneath your pot to collect excess water. For most plants in standard planters, we recommend watering about once a week. Water the soil mass until water begins pooling in your Plant Saucer.
With no drainage hole, you will need to be more precise in your watering. While we would love to give you a specific measurement of water to provide for your plant, the reality is that a plant's water requirements vary wildly depending on factors such as light exposure and the overall health of the plant. You will need to learn to tell when the plant is thirsty based on how its foliage looks. Droopy foliage is usually the first sign: when your plant looks a little slumped over that's usually a visual indicator that it's thirsty.
The best solution for checking your plant's moisture level, drainage hole of not, is to use a Soil Probe to determine the moisture content of the soil at the bottom of the planter.
Self Watering Planter Instructions
The Self-Watering Planters require a deep and thorough watering of the topsoil after they are first planted. This is important because the roots of the plants first need to grow into the reservoir in order to drink from it. Water your plant from the top for two to four weeks before using the reservoir. During the dormant seasons, or for plants that have slower growing habits, consider top watering for longer.
TEST: After the initial top water period, fill the bottom water reservoir. If the water in the reservoir is absorbed into the planter, it means the plant is ready for regular reservoir servicing. If not, be sure to continue top watering for a few more weeks until the plant has started drinking from the reservoir.
RESERVOIR SERVICING: Once the reservoir empties on its own, do not refill the reservoir right away. Similar to how humans need a breath of air between gulps of water, most plants require a drying out period. Allow for the reservoir to empty all the way between watering. All plants are different in their needs so the amount of time the reservoir sits empty will need to be determined, but know that for most plants this period is between 1-3 days.
From here on out, you should rarely topwater the plant while using the reservoir system. Watering from below allows the plant to drink at its own pace, and can help combat certain issues like fungus gnats by allowing the top layer of soil to dry out more. Please note that if your plant's soil dries out too much, it can impair the wicking ability of the Aeration Stones in your planter. If your soil becomes too dry, we recommend giving it a thorough watering.
For more information on our Self Watering Planters include planting instructions, visit our blog post on How to Use Our Self-Watering Pots.
Recommended Accessories
Aeration Stones
Aeration Stones promote healthy root growth by creating air pockets in the soil and absorbing excess water in the basin of your planter. These porous clay stones are a natural, efficient and invaluable material to set your plant up for success. We always suggest using these when working with a planter without drainage holes.
ARS Stainless Steel Pruners
Salts and moisture from potting soil wreaks havoc on cheaper metals. Stainless steel is one of the most durable metals available on a consumer scale, and these heavy duty pruners are built to take a beating. Great for pruning jobs large and small.
Neem Oil
Neem Oil is an all purpose insecticide, miticide, and fungicide used for organic gardening. It's systemic, which means the plant will absorb the neem oil into its circulatory system and poison pests from within. Be careful not to overuse, as this can weaken plants and cause discoloration.
Soil Probe
Plants do poorly without air to the roots. Overwatering causes the air to be pushed out of the soil, compacting the soil around the waterlogged roots of the plant. Using the Soil Probe aerates the soil as it checks for moisture.
Watering Can
Watering cans come in all shapes and sizes, and the perfect one for your home is the one you're happiest living with. Look for long spouts and a container volume that's appropriate for your plant collection.
Soil
Fox Farm Ocean Forest contains all the features we look for when aiming to ensure the long term health of a plant: excellent water retention, breathability, texture, and is made from organic materials.
Fertilizer
10-4-3 fertilizer is a great, gentle choice for indoor foliage. Simply mix this in to your watering can using the supplied directions every other week. Ensure that your plant is receiving a good amount of light, otherwise it won't have the energy to process the nutrients and burnt tips may occur on the foliage.
Cork Mats
Protects furniture and floors from scratches and moisture. HIGHLY RECOMMENDED for use with planters made from organic materials such as ceramic.